Showing posts with label DIY. Show all posts

Monday, 16 July 2012

DIY: Making your very own clutch

I do not own any of the pictures, all are taken from the net :)

Hi Fashion lovers,
yet another post on DIY tips, i simple love them as you can make your very own special design which is different from others.
This post, will be about CLUTCH! ^^ 
Clutch is a small bag which normally you don't put much stuffs other than your wallet, handphone, and some other important items. It's very small and nice to carry around, also very easy to match with what you wear.

So here's some tips to created your very own clutch with your old bags or unwanted clutch.
Add some style into them! 

First up,
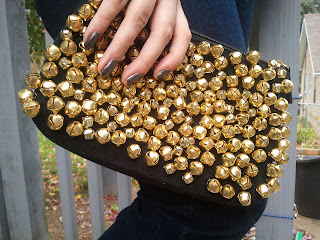
Christina Louboutin-Inspired Bell Clutch
Supplies needed:
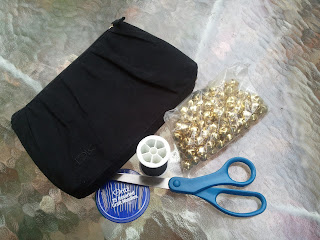
small to medium black clutch
gold bells-I ended up using two sizes to add some depth to the piece
thread, needle, and scissors
 Christian Louboutin-inspired bell clutch
Christian Louboutin-inspired bell clutch
Tips:
 1) To make sure they were securely attached I sewed through the top of the bell a few times to be safe. 
2) Instead of piercing through to the inner lining I tried to only sew through the outer fabric, that way the thread is sandwiched between the two.


Second design clutch will be...
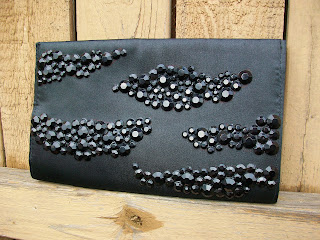
Jimmy Choo Inspired Rhinestone Clutch
Supplies needed:
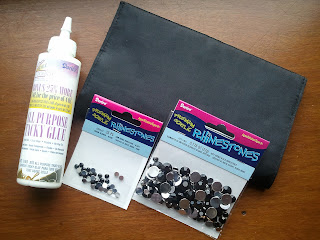
Simple non-embellished clutch
Assorted rhinestones in a coordinating color
Glue
DIY Jimmy Choo inspired rhinestone clutch tutorial
Tips:
1) Use a sharpie and outlined the shape of the stripes you want
2)  Use different sizes rhinestone, it's easier to fill.

The 3rd design will be

Studded Suede Pouch 

Supplies needed:
1. A suede (or leather, or felt) Clutch
2. Packages of pyramid studs 

Last DIY of the day will be

DIY: Zara Inspired Sequined Clutch

zara-tutorial1
Supplies needed:
-cheetah/leopard fabric
-duck cloth canvas fabric
-leather craft Glue
-2 row sequin 

Steps:
1. Measure your canvas fabric. My zipper was 9 inches long so I gave my clutch a generous 9 and a half inches in the length and 6 inches in the width- 9×6.
2. Cut the satin fabric the same size as your clutch cutout and glue it with your Leathercraft Cement. This stuff is truly amazing.
3. Place a thin strip of glue along the drawn edges of your clutch and glue them together by folding. Wait until the glue is completely dry to unfold the clutch.
4. Sew on the zipper.
5. Measure the sequin trim to the length of the pouch and glue it down.
6. Glue down some silver sequins and beads in a organized zig-zag pattern.

That's all for today's DIY post!! Have fun doing them! ^^

Friday, 13 July 2012

DIY: Transform your old accessories

P.S all image are taken from online, i don't own anything :)
Hi fashion lovers, 
Well, this post will be about a few DIY tips to make your very own accessories or even transform your old accessories that you don't want into something trendy. 
I won't be too wordy in this post, and most of them are pictures! ^^
So let pictures do the talking!

Alright lets start with the first DIY tip which is....

D.I.Y NEON NECKLACE


Difficulty level:  EASY
Things you would need:
Tips: 
1) If you don't have neon polish you can try using pastel ones which is in trend now too!!
2) If you don't have, borrow from friend or buy from Cine level 2 or buy online.

Steps: 
Just paint and let it dry. Be creative with the colours!
 

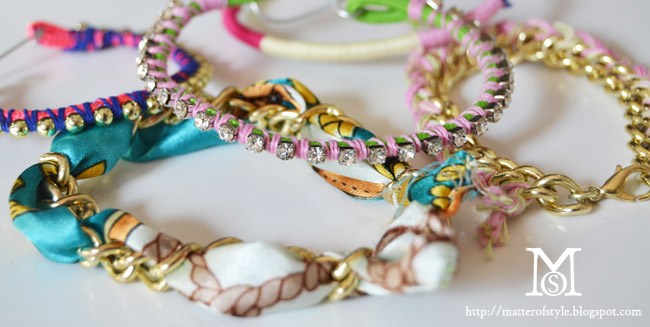
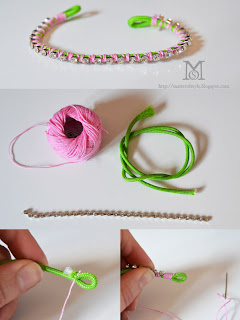
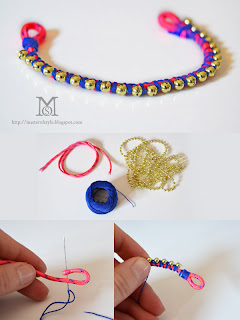
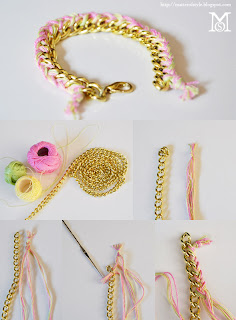
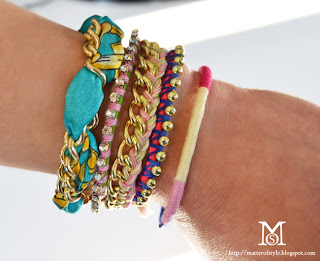
2) Make 5 bracelets in 10 minutes
Difficulty level:  EASY
arm party diy, diy, my diy, fashion diy, diy bracelets, rope bracelets, scarf bracelet, ball chain bracelet, crystal chain bracelet, yarn bracelet, braided bracelets 
arm party diy, diy, my diy, fashion diy, diy bracelets, rope bracelets, scarf bracelet, ball chain bracelet, crystal chain bracelet, yarn bracelet, braided bracelets, how to make a bracelet, jewelry diy, how to, arm party diy, diy, my diy, fashion diy, diy bracelets, rope bracelets, scarf bracelet, ball chain bracelet, crystal chain bracelet, yarn bracelet, braided bracelets, how to make a bracelet, jewelry diy, how to, arm party diy, diy, my diy, fashion diy, diy bracelets, rope bracelets, scarf bracelet, ball chain bracelet, crystal chain bracelet, yarn bracelet, braided bracelets, how to make a bracelet, jewelry diy, how to, arm party diy, diy, my diy, fashion diy, diy bracelets, rope bracelets, scarf bracelet, ball chain bracelet, crystal chain bracelet, yarn bracelet, braided bracelets, how to make a bracelet, jewelry diy, how to,
arm party diy, diy, my diy, fashion diy, diy bracelets, rope bracelets, scarf bracelet, ball chain bracelet, crystal chain bracelet, yarn bracelet, braided bracelets, how to make a bracelet, jewelry diy, how to,  arm party diy, friendship bracelets, diy, my diy, fashion diy, diy bracelets, rope bracelets, scarf bracelet, ball chain bracelet, crystal chain bracelet, yarn bracelet, braided bracelets

Next up,
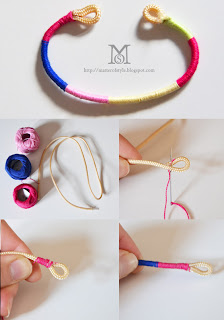
DIY Braided Charm Bracelets
Difficulty level:  EASY
If the image are too small or you don't understand watch the video tutorial here:

DIY Friendship Woven Bracelets

Difficulty level:  EASY
bracelt tutorial

That's all for DIY tips of accessories ! 
All of them are rather simple, you just need to have all the materials.
You can buy them from any craft shop, artfriend, spotlight, etc! 
P.S. it's always more fun to do DIYs with your friends around! 

Wednesday, 30 May 2012

DIY: Haircolour

Hi Strangers,
Finally another post on DIY, this post will be about hair!
As you know or can see on the street, dip-dye became very trendy for a period of time!
Did you notice it? 
Yup they are super nice, i did it for CNY but the colour had faded ):
So for some of you wish to try out, but you know some salon don't have the colour you want and some are really expensive when you do at salon like min. $50? 
So here's some diy for you!! 

There will be 2 parts in this post, but before i start i have to state that this is not a sponsored or paid post! 
All the shop links i posted are just some that i happened to see while using facebook and the prices are really reasonable!! 

Okay lets start with the Chalk hair dye! 
I bet some of you have seen it selling in Facebook. 
Is the set of chalks below:
If you are not sure what i'm talking there's this picture going on facebook showing how it will looks like:

All above pictures are taken from this facebook shop called Rachel Loots she is selling them at just $6 per box! Super cheap, i see some selling at $15? If you're still wondering how it works try watching these videos below:
Super cool right? If you wanna try i suggest your get from Rachel Loots she is the only shop that i saw selling at below $10! 

The other one is, if you want the dye to stay and not wash off but hard to get colours like Pink, blue, green outside, or even some salon don't have them. Try getting from Joyce Closet the hair dyes she sell are at $26 per bottle, slightly expensive but for the colour! Its worth it!
This is how the bottle of dye look like:
There's lots more colour over at their web! Go check it out.
Here's a video to teach you how to do dip dye at home!

So if you not sure what colour to do, here's some inspirational photos for you to choose!
   

If you want more, just go google them! There are a lot more pretty ones! (;

Wednesday, 16 May 2012

DIY: Awesome shorts

Hi Strangers,
Don't you just love these awesome shorts? :)
All the tumblr inspired shorts, that you would wish to owe them~
But you would most likely know the price rage be like right? 
Min. $40 right? ): I felt so sad every time i see these shorts but yet can't own them.
Do you have the same feeling too? 

So here are some basic tutorials for these awesome shorts!! 
You can try doing it at home! ^^ 
I'm gonna try them during the holidays, can't wait! 
Gonna show you girls a few tutorials, so stay till the end! 
P.S. all these tutorials i gotten are from the internet! ^^

Design 1: Metallic Floral Prints
Ingredients:
- Any denim shorts 
-24mm & 14mm Round Jewels 
-30mm Paillette Sequins 
-White Fabric Paint
-Fabric Glue 
-Real or Fake Flowers (Note: If you decide to use real flowers, it's best to have four or five on hand in case they begin to fall apart from the paint.)
-Ruler
-Pencil

If you're interested in doing this shorts, get the step by step tutorial: HERE!

Design 2:  Tribal shorts
Items needed: An old denim, a pair of scissors, bleach, permanent marker
  • Cut the denim’s legs off. Make sure you fit and mark where to cut before the damage is done.
  • For a distress feel, make small cuts. Put the shorts through a washing machine to get full fray effect.
  • lay the shorts’ ends in 1:1 water:bleach mix
  • Wait until you get your desired colour. This can take a while, so please be patient
  • With a permanent marker, draw the print on the shorts.


Design 3: Lace short
Watch the tutorial below!


Alright shall just show this 3 simple designs!
Actually you can just go to spotlight to get any fabric paint to dye your shorts!
Hope you like it! (:
Next tutorial will be about hair! ^^

Saturday, 12 May 2012

DIY: Tie-dye effects

Hi Fashion lovers,
This will be a short post with all the pictures only!
Many of you must have seen different types of tie-dye tops right? 
Some designs below: 

I love those bikini, looks so cheerful!! 
It's actually really simple to do these effects, all you need is:
1) Time
2) Fabric Dye
3) Some rubber band or strings
4) A White tee or anything!

So if you're wondering how to get those designs, here are some image to teach you!

I hope this helps you! ^^
Feel free to email me or formspring me if you tried it out alright! ^^