Showing posts with label fashion. Show all posts

Monday, 16 July 2012

DIY: Making your very own clutch

I do not own any of the pictures, all are taken from the net :)

Hi Fashion lovers,
yet another post on DIY tips, i simple love them as you can make your very own special design which is different from others.
This post, will be about CLUTCH! ^^ 
Clutch is a small bag which normally you don't put much stuffs other than your wallet, handphone, and some other important items. It's very small and nice to carry around, also very easy to match with what you wear.

So here's some tips to created your very own clutch with your old bags or unwanted clutch.
Add some style into them! 

First up,
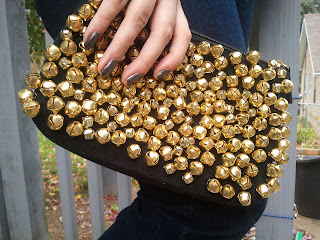
Christina Louboutin-Inspired Bell Clutch
Supplies needed:
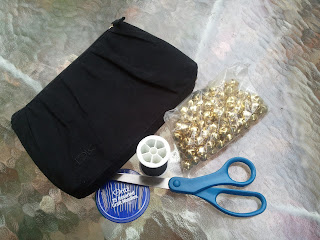
small to medium black clutch
gold bells-I ended up using two sizes to add some depth to the piece
thread, needle, and scissors
 Christian Louboutin-inspired bell clutch
Christian Louboutin-inspired bell clutch
Tips:
 1) To make sure they were securely attached I sewed through the top of the bell a few times to be safe. 
2) Instead of piercing through to the inner lining I tried to only sew through the outer fabric, that way the thread is sandwiched between the two.


Second design clutch will be...
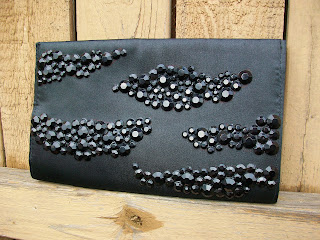
Jimmy Choo Inspired Rhinestone Clutch
Supplies needed:
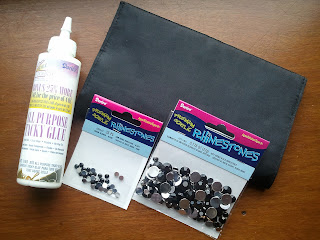
Simple non-embellished clutch
Assorted rhinestones in a coordinating color
Glue
DIY Jimmy Choo inspired rhinestone clutch tutorial
Tips:
1) Use a sharpie and outlined the shape of the stripes you want
2)  Use different sizes rhinestone, it's easier to fill.

The 3rd design will be

Studded Suede Pouch 

Supplies needed:
1. A suede (or leather, or felt) Clutch
2. Packages of pyramid studs 

Last DIY of the day will be

DIY: Zara Inspired Sequined Clutch

zara-tutorial1
Supplies needed:
-cheetah/leopard fabric
-duck cloth canvas fabric
-leather craft Glue
-2 row sequin 

Steps:
1. Measure your canvas fabric. My zipper was 9 inches long so I gave my clutch a generous 9 and a half inches in the length and 6 inches in the width- 9×6.
2. Cut the satin fabric the same size as your clutch cutout and glue it with your Leathercraft Cement. This stuff is truly amazing.
3. Place a thin strip of glue along the drawn edges of your clutch and glue them together by folding. Wait until the glue is completely dry to unfold the clutch.
4. Sew on the zipper.
5. Measure the sequin trim to the length of the pouch and glue it down.
6. Glue down some silver sequins and beads in a organized zig-zag pattern.

That's all for today's DIY post!! Have fun doing them! ^^

Friday, 13 July 2012

DIY: Transform your old accessories

P.S all image are taken from online, i don't own anything :)
Hi fashion lovers, 
Well, this post will be about a few DIY tips to make your very own accessories or even transform your old accessories that you don't want into something trendy. 
I won't be too wordy in this post, and most of them are pictures! ^^
So let pictures do the talking!

Alright lets start with the first DIY tip which is....

D.I.Y NEON NECKLACE


Difficulty level:  EASY
Things you would need:
Tips: 
1) If you don't have neon polish you can try using pastel ones which is in trend now too!!
2) If you don't have, borrow from friend or buy from Cine level 2 or buy online.

Steps: 
Just paint and let it dry. Be creative with the colours!
 

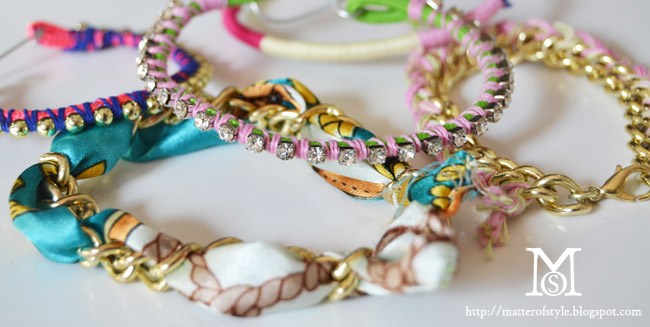
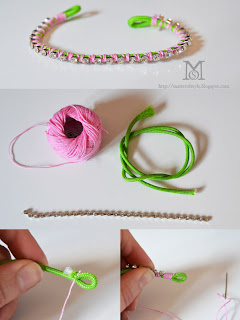
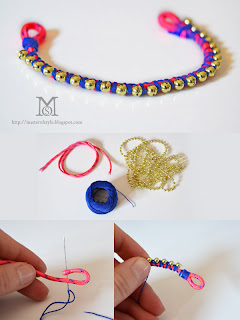
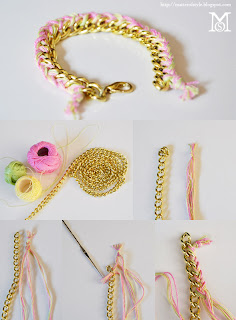
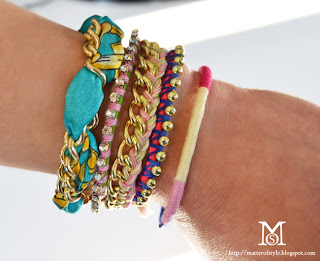
2) Make 5 bracelets in 10 minutes
Difficulty level:  EASY
arm party diy, diy, my diy, fashion diy, diy bracelets, rope bracelets, scarf bracelet, ball chain bracelet, crystal chain bracelet, yarn bracelet, braided bracelets 
arm party diy, diy, my diy, fashion diy, diy bracelets, rope bracelets, scarf bracelet, ball chain bracelet, crystal chain bracelet, yarn bracelet, braided bracelets, how to make a bracelet, jewelry diy, how to, arm party diy, diy, my diy, fashion diy, diy bracelets, rope bracelets, scarf bracelet, ball chain bracelet, crystal chain bracelet, yarn bracelet, braided bracelets, how to make a bracelet, jewelry diy, how to, arm party diy, diy, my diy, fashion diy, diy bracelets, rope bracelets, scarf bracelet, ball chain bracelet, crystal chain bracelet, yarn bracelet, braided bracelets, how to make a bracelet, jewelry diy, how to, arm party diy, diy, my diy, fashion diy, diy bracelets, rope bracelets, scarf bracelet, ball chain bracelet, crystal chain bracelet, yarn bracelet, braided bracelets, how to make a bracelet, jewelry diy, how to,
arm party diy, diy, my diy, fashion diy, diy bracelets, rope bracelets, scarf bracelet, ball chain bracelet, crystal chain bracelet, yarn bracelet, braided bracelets, how to make a bracelet, jewelry diy, how to,  arm party diy, friendship bracelets, diy, my diy, fashion diy, diy bracelets, rope bracelets, scarf bracelet, ball chain bracelet, crystal chain bracelet, yarn bracelet, braided bracelets

Next up,
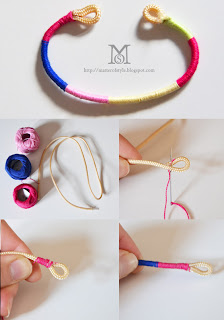
DIY Braided Charm Bracelets
Difficulty level:  EASY
If the image are too small or you don't understand watch the video tutorial here:

DIY Friendship Woven Bracelets

Difficulty level:  EASY
bracelt tutorial

That's all for DIY tips of accessories ! 
All of them are rather simple, you just need to have all the materials.
You can buy them from any craft shop, artfriend, spotlight, etc! 
P.S. it's always more fun to do DIYs with your friends around! 

Sunday, 8 July 2012

Lovely Saturdays w/ the girls.

Hi lovely strangers, 
Sorry for the lack of updates, was really really really busy during the weekdays with school, projects and assignments. The only free time i have is either Saturday or Sunday, so i spend my Saturday out with my 2 lovely and pretty girls, Yann and Tiffany. 
We went shopping at Tampines, as Tiffany wanna go Isetan to get some stuffs and Yann wanna go Topshop to try out her super bling bling dress! You will know the bling-ness later when you see the pictures. 
First stop we went to Isetan to get Tiffany stuff as she had a $50 voucher so she decided to buy a Billabong backpack for school the usual price is $69.90 so after deducting the remaining amount is only $9.90?! 
She only spend $10 on a branded bag! Cool? hahas. Here's how the bag look like (from what i remember)
I think it's a very sweet design, really happy for her! ^^ 
 She also liked one of the bikini there but it was $79.90 so unless she have another $50 voucher~ Guess she will 舍不得 (reluctant to) buy it. For me i will also not buy it, if it's more than $50... *cheapo*
So after Billabong we went to Topshop!!! There's still sales over at Topshop and you get additional 10% off your bill if you are DBS or Mastercard users. We were so happy to be there and we spend about 1hour plus over there, we each took a few items to try so here's what we took:
1) Tiffany:
*some of the photo is not total the same as the one she took but similar cause i can't find them*
2) Yann

3) Me
*The last tank is different from what i took but similar cutting*

So if you're wondering why girls always take a long time in changing room......
*click on the image to enlarge it!*

hahahas enough of all the camhoring pictures, here's a picture of the 3 of us together!

Oh man, why am i so short ): Look at how tall and pretty Yann and Tiffany are *jealous*
Alright, i didn't buy anything yesterday even after spending the whole afternoon there but i'm planning on getting the denim short so pleaseeee still be there when i have enough money to buy you.

Trying to save some money from what i spend last few weeks, i bought a cardigan and a bikini~ 

& forgot if i bought anything else. hahahs goldfish brains.
Shall end off here, Enjoy your weekends! :)
I will also be scheduling some post up this week at 1.30pm!! ^^ Do check back! 
What to see: Advertorials, DIY post.